라우터
이 장에서는 REST에서 설정이 가능한 라우터를 사용하는 방법에 대해 설명합니다.
단일 테넌트의 동작 예
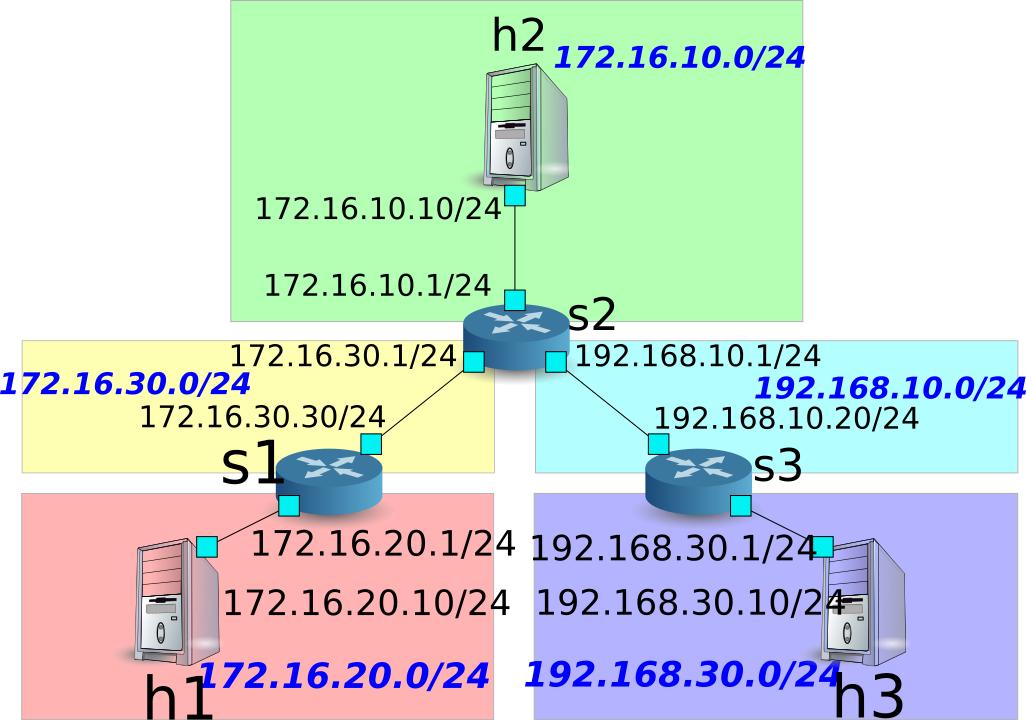
다음과 같은 토폴로지를 만들고 각 스위치 (라우터)에 주소와 경로를 추가하거나 삭제할 각 호스트 간의 통신 가능 여부를 확인하는 방법을 소개합니다.

환경 구축
- 우선 Mininet에 환경을 구축합니다. mn 명령의 매개 변수는 다음과
- 같습니다.
| 매개변수 | 값 | 설명 |
|---|---|---|
| topo | linear,3 | 3 개의 스위치가 일렬로 연결되는 토폴로지 |
| mac | 없음 | 자동으로 호스트의 MAC 주소를 설정 |
| switch | ovsk | Open vSwitch를 사용 |
| controller | remote | OpenFlow 컨트롤러는 외부의 것을 이용 |
| x | 없음 | xterm을 시작 |
실행 예는 다음과 같습니다.
ryu@ryu-vm:~$ sudo mn --topo linear,3 --mac --switch ovsk --controller remote -x
*** Creating network
*** Adding controller
Unable to contact the remote controller at 127.0.0.1:6633
*** Adding hosts:
h1 h2 h3
*** Adding switches:
s1 s2 s3
*** Adding links:
(h1, s1) (h2, s2) (h3, s3) (s1, s2) (s2, s3)
*** Configuring hosts
h1 h2 h3
*** Running terms on localhost:10.0
*** Starting controller
*** Starting 3 switches
s1 s2 s3

*** Starting CLI:
mininet>
또한 또 다른 컨트롤러의 xterm을 시작합니다.
mininet> xterm c0
mininet>
이어 각 라우터에서 사용하는 OpenFlow 버전을 1.3으로 설정합니다.
switch: s1 (root):
root@ryu-vm:~# ovs-vsctl set Bridge s1 protocols=OpenFlow13
switch: s2 (root):
root@ryu-vm:~# ovs-vsctl set Bridge s2 protocols=OpenFlow13
switch: s3 (root):
root@ryu-vm:~# ovs-vsctl set Bridge s3 protocols=OpenFlow13
그런 다음 각 호스트에서 자동으로 할당 된 IP 주소를 삭제하고 새로운 IP 주소를 설정합니다.
host: h1:
root@ryu-vm:~# ip addr del 10.0.0.1/8 dev h1-eth0
root@ryu-vm:~# ip addr add 172.16.20.10/24 dev h1-eth0
host: h2:
root@ryu-vm:~# ip addr del 10.0.0.2/8 dev h2-eth0
root@ryu-vm:~# ip addr add 172.16.10.10/24 dev h2-eth0
host: h3:
root@ryu-vm:~# ip addr del 10.0.0.3/8 dev h3-eth0
root@ryu-vm:~# ip addr add 192.168.30.10/24 dev h3-eth0
마지막으로, 컨트롤러 xterm에서 rest_router을 시작합니다.
controller: c0 (root):
root@ryu-vm:~# ryu-manager ryu.app.rest_router
loading app ryu.app.rest_router
loading app ryu.controller.ofp_handler
instantiating app None of DPSet
creating context dpset
creating context wsgi
instantiating app ryu.app.rest_router of RestRouterAPI
instantiating app ryu.controller.ofp_handler of OFPHandler
(2212) wsgi starting up on http://0.0.0.0:8080/
Ryu와 라우터 간의 연결에 성공하면 다음 메시지가 표시됩니다.
controller: c0 (root):
[RT][INFO] switch_id=0000000000000003: Set SW config for TTL error packet in.
[RT][INFO] switch_id=0000000000000003: Set ARP handling (packet in) flow [cookie=0x0]
[RT][INFO] switch_id=0000000000000003: Set L2 switching (normal) flow [cookie=0x0]
[RT][INFO] switch_id=0000000000000003: Set default route (drop) flow [cookie=0x0]
[RT][INFO] switch_id=0000000000000003: Start cyclic routing table update.
[RT][INFO] switch_id=0000000000000003: Join as router.
...
위 로그 라우터 3 대분이 표시되면 준비 완료입니다.
주소 설정
각 라우터에 주소를 설정합니다.
먼저 라우터 s1 주소 「172.16.20.1/24」와 「172.16.30.30/24」를 설정합니다.
주석
이후의 설명에서 사용하는 REST API의 자세한 내용은 장 끝부분의 「 REST API 목록 」을 참조하십시오.
Node: c0 (root):
root@ryu-vm:~# curl -X POST -d '{"address":"172.16.20.1/24"}' http://localhost:8080/router/0000000000000001
  [
    {
      "switch_id": "0000000000000001",
      "command_result": [
        {
          "result": "success",
          "details": "Add address [address_id=1]"
        }
      ]
    }
  ]

root@ryu-vm:~# curl -X POST -d '{"address": "172.16.30.30/24"}' http://localhost:8080/router/0000000000000001
  [
    {
      "switch_id": "0000000000000001",
      "command_result": [
        {
          "result": "success",
          "details": "Add address [address_id=2]"
        }
      ]
    }
  ]
주석
REST 명령의 실행 결과는 보기 쉽도록 포맷화하였습니다.
그런 다음 라우터 s2에 주소 「172.16.10.1/24」 「172.16.30.1/24」 「192.168.10.1/24」을 설정합니다.
Node: c0 (root):
root@ryu-vm:~# curl -X POST -d '{"address":"172.16.10.1/24"}' http://localhost:8080/router/0000000000000002
  [
    {
      "switch_id": "0000000000000002",
      "command_result": [
        {
          "result": "success",
          "details": "Add address [address_id=1]"
        }
      ]
    }
  ]

root@ryu-vm:~# curl -X POST -d '{"address": "172.16.30.1/24"}' http://localhost:8080/router/0000000000000002
  [
    {
      "switch_id": "0000000000000002",
      "command_result": [
        {
          "result": "success",
          "details": "Add address [address_id=2]"
        }
      ]
    }
  ]

root@ryu-vm:~# curl -X POST -d '{"address": "192.168.10.1/24"}' http://localhost:8080/router/0000000000000002
  [
    {
      "switch_id": "0000000000000002",
      "command_result": [
        {
          "result": "success",
          "details": "Add address [address_id=3]"
        }
      ]
    }
  ]
또한 라우터 s3에 주소 「192.168.30.1/24」와 「192.168.10.20/24」을 설정 합니다.
Node: c0 (root):
root@ryu-vm:~# curl -X POST -d '{"address": "192.168.30.1/24"}' http://localhost:8080/router/0000000000000003
  [
    {
      "switch_id": "0000000000000003",
      "command_result": [
        {
          "result": "success",
          "details": "Add address [address_id=1]"
        }
      ]
    }
  ]

root@ryu-vm:~# curl -X POST -d '{"address": "192.168.10.20/24"}' http://localhost:8080/router/0000000000000003
  [
    {
      "switch_id": "0000000000000003",
      "command_result": [
        {
          "result": "success",
          "details": "Add address [address_id=2]"
        }
      ]
    }
  ]
라우터에 IP 주소를 할당할 수 있기 때문에 각 호스트에 기본 게이트웨이로 등록합니다.
host: h1:
root@ryu-vm:~# ip route add default via 172.16.20.1
host: h2:
root@ryu-vm:~# ip route add default via 172.16.10.1
host: h3:
root@ryu-vm:~# ip route add default via 192.168.30.1
기본 경로 설정
각 라우터에 기본 경로를 설정합니다.
먼저 라우터 s1의 기본 경로로 라우터 s2를 설정합니다.
Node: c0 (root):
root@ryu-vm:~# curl -X POST -d '{"gateway": "172.16.30.1"}' http://localhost:8080/router/0000000000000001
  [
    {
      "switch_id": "0000000000000001",
      "command_result": [
        {
          "result": "success",
          "details": "Add route [route_id=1]"
        }
      ]
    }
  ]
라우터 s2의 기본 경로는 라우터 s1을 설정합니다.
Node: c0 (root):
root@ryu-vm:~# curl -X POST -d '{"gateway": "172.16.30.30"}' http://localhost:8080/router/0000000000000002
  [
    {
      "switch_id": "0000000000000002",
      "command_result": [
        {
          "result": "success",
          "details": "Add route [route_id=1]"
        }
      ]
    }
  ]
라우터 s3의 기본 경로는 라우터 s2를 설정합니다.
Node: c0 (root):
root@ryu-vm:~# curl -X POST -d '{"gateway": "192.168.10.1"}' http://localhost:8080/router/0000000000000003
  [
    {
      "switch_id": "0000000000000003",
      "command_result": [
        {
          "result": "success",
          "details": "Add route [route_id=1]"
        }
      ]
    }
  ]
정적 경로 설정
라우터 s2에 대해 라우터 s3 부하의 호스트 (192.168.30.0/24)에 고정 경로 를 설정합니다.
Node: c0 (root):
root@ryu-vm:~# curl -X POST -d '{"destination": "192.168.30.0/24", "gateway": "192.168.10.20"}' http://localhost:8080/router/0000000000000002
  [
    {
      "switch_id": "0000000000000002",
      "command_result": [
        {
          "result": "success",
          "details": "Add route [route_id=2]"
        }
      ]
    }
  ]
주소 및 경로 설정 상태는 다음과 같습니다.
설정 내용 확인
각 라우터에 설정된 내용을 확인합니다.
Node: c0 (root):
root@ryu-vm:~# curl http://localhost:8080/router/0000000000000001
  [
    {
      "internal_network": [
        {
          "route": [
            {
              "route_id": 1,
              "destination": "0.0.0.0/0",
              "gateway": "172.16.30.1"
            }
          ],
          "address": [
            {
              "address_id": 1,
              "address": "172.16.20.1/24"
            },
            {
              "address_id": 2,
              "address": "172.16.30.30/24"
            }
          ]
        }
      ],
      "switch_id": "0000000000000001"
    }
  ]

root@ryu-vm:~# curl http://localhost:8080/router/0000000000000002
  [
    {
      "internal_network": [
        {
          "route": [
            {
              "route_id": 1,
              "destination": "0.0.0.0/0",
              "gateway": "172.16.30.30"
            },
            {
              "route_id": 2,
              "destination": "192.168.30.0/24",
              "gateway": "192.168.10.20"
            }
          ],
          "address": [
            {
              "address_id": 2,
              "address": "172.16.30.1/24"
            },
            {
              "address_id": 3,
              "address": "192.168.10.1/24"
            },
            {
              "address_id": 1,
              "address": "172.16.10.1/24"
            }
          ]
        }
      ],
      "switch_id": "0000000000000002"
    }
  ]

root@ryu-vm:~# curl http://localhost:8080/router/0000000000000003
  [
    {
      "internal_network": [
        {
          "route": [
            {
              "route_id": 1,
              "destination": "0.0.0.0/0",
              "gateway": "192.168.10.1"
            }
          ],
          "address": [
            {
              "address_id": 1,
              "address": "192.168.30.1/24"
            },
            {
              "address_id": 2,
              "address": "192.168.10.20/24"
            }
          ]
        }
      ],
      "switch_id": "0000000000000003"
    }
  ]
이 상태에서 ping에 의한 통신을 확인하여보십시오. 먼저 h2에서 h3에 ping을 수행합니다 입니다. 성공적으로 통신하는 것을 확인할 수 있습니다.
host: h2:
root@ryu-vm:~# ping 192.168.30.10
PING 192.168.30.10 (192.168.30.10) 56(84) bytes of data.
64 bytes from 192.168.30.10: icmp_req=1 ttl=62 time=48.8 ms
64 bytes from 192.168.30.10: icmp_req=2 ttl=62 time=0.402 ms
64 bytes from 192.168.30.10: icmp_req=3 ttl=62 time=0.089 ms
64 bytes from 192.168.30.10: icmp_req=4 ttl=62 time=0.065 ms
...
또한 h2에서 h1로 ping을 실행합니다. 이쪽도 제대로 통신할 수 있는지 확인 할 수 있습니다.
host: h2:
root@ryu-vm:~# ping 172.16.20.10
PING 172.16.20.10 (172.16.20.10) 56(84) bytes of data.
64 bytes from 172.16.20.10: icmp_req=1 ttl=62 time=43.2 ms
64 bytes from 172.16.20.10: icmp_req=2 ttl=62 time=0.306 ms
64 bytes from 172.16.20.10: icmp_req=3 ttl=62 time=0.057 ms
64 bytes from 172.16.20.10: icmp_req=4 ttl=62 time=0.048 ms
...
정적 경로 삭제
라우터 s2에 설정한 라우터 s3에 정적 경로를 제거합니다.
Node: c0 (root):
root@ryu-vm:~# curl -X DELETE -d '{"route_id": "2"}' http://localhost:8080/router/0000000000000002
  [
    {
      "switch_id": "0000000000000002",
      "command_result": [
        {
          "result": "success",
          "details": "Delete route [route_id=2]"
        }
      ]
    }
  ]
라우터 s2에 설정된 정보를 확인하여보십시오. 라우터 s3에 고정 경로가 삭제된 것을 알 수 있습니다.
Node: c0 (root):
root@ryu-vm:~# curl http://localhost:8080/router/0000000000000002
  [
    {
      "internal_network": [
        {
          "route": [
            {
              "route_id": 1,
              "destination": "0.0.0.0/0",
              "gateway": "172.16.30.30"
            }
          ],
          "address": [
            {
              "address_id": 2,
              "address": "172.16.30.1/24"
            },
            {
              "address_id": 3,
              "address": "192.168.10.1/24"
            },
            {
              "address_id": 1,
              "address": "172.16.10.1/24"
            }
          ]
        }
      ],
      "switch_id": "0000000000000002"
    }
  ]
이 상태에서 ping에 의한 통신을 확인하여보십시오. h2에서 h3까지는 노선 정보가 없어 때문에 통신할 수 없는 것을 알 수 있습니다.
host: h2:
root@ryu-vm:~# ping 192.168.30.10
PING 192.168.30.10 (192.168.30.10) 56(84) bytes of data.
^C
--- 192.168.30.10 ping statistics ---
12 packets transmitted, 0 received, 100% packet loss, time 11088ms
주소 삭제
라우터 s1에 설정 한 주소 「172.16.20.1/24」를 삭제합니다.
Node: c0 (root):
root@ryu-vm:~# curl -X DELETE -d '{"address_id": "1"}' http://localhost:8080/router/0000000000000001
  [
    {
      "switch_id": "0000000000000001",
      "command_result": [
        {
          "result": "success",
          "details": "Delete address [address_id=1]"
        }
      ]
    }
  ]
라우터 s1에 설정된 정보를 확인하여보십시오. 라우터 s1에 설정된 IP 주소 중 「172.16.20.1/24」가 삭제된 것을 알 수 있습니다.
Node: c0 (root):
root@ryu-vm:~# curl http://localhost:8080/router/0000000000000001
  [
    {
      "internal_network": [
        {
          "route": [
            {
              "route_id": 1,
              "destination": "0.0.0.0/0",
              "gateway": "172.16.30.1"
            }
          ],
          "address": [
            {
              "address_id": 2,
              "address": "172.16.30.30/24"
            }
          ]
        }
      ],
      "switch_id": "0000000000000001"
    }
  ]
이 상태에서 ping에 의한 통신을 확인하여보십시오. h2에서 h1으로는 h1에 속한 하위 인터넷에 대한 정보를 라우터 s1에서 삭제하였기 때문에, 통신할 수 없다는 사실을 알 수 없습니다.
host: h2:
root@ryu-vm:~# ping 172.16.20.10
PING 172.16.20.10 (172.16.20.10) 56(84) bytes of data.
^C
--- 172.16.20.10 ping statistics ---
19 packets transmitted, 0 received, 100% packet loss, time 18004ms
멀티 테넌트의 동작 예
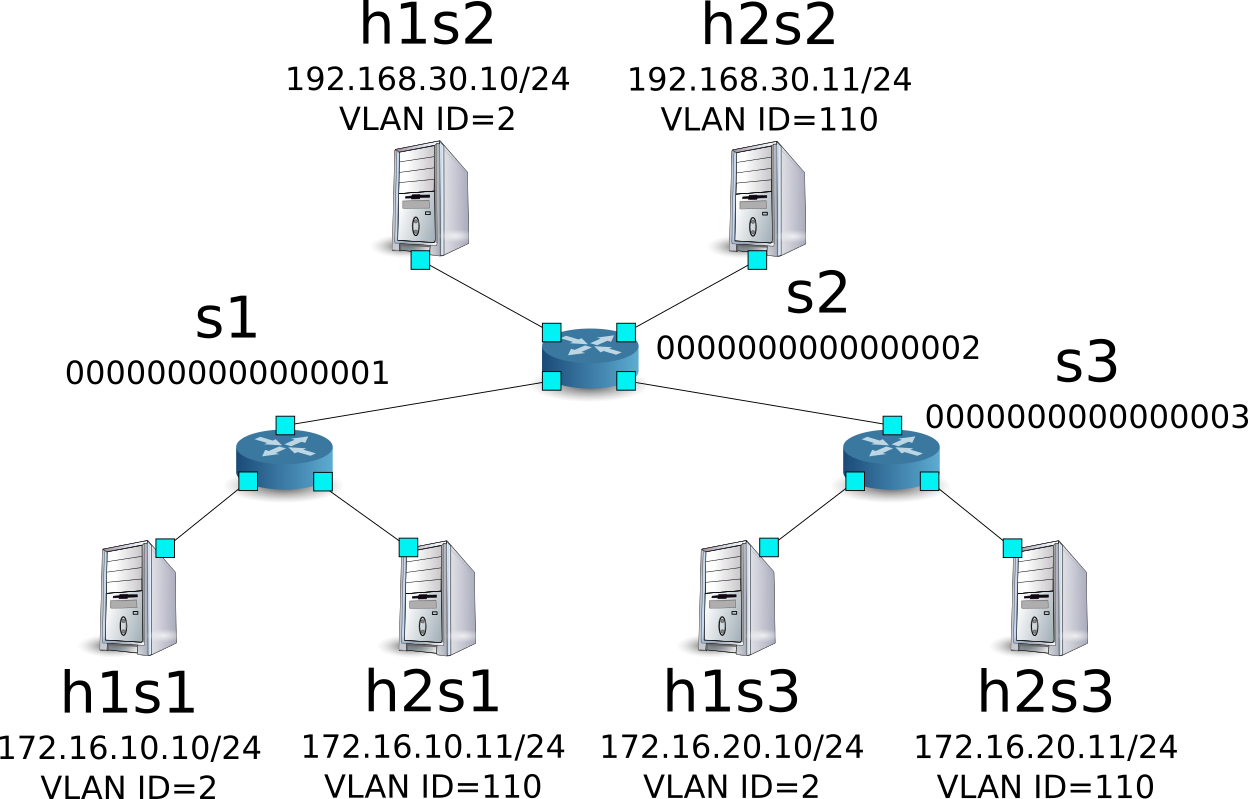
이어 VLAN에 의한 테넌트 구분이 이루어지고 있는 다음과 같은 토폴로지를 만들고 각 스위치 (라우터)에 주소와 경로를 추가하거나 삭제할 각 호스트 간의 통신 여부를 확인하는 방법을 소개합니다.
환경 구축
우선 Mininet에 환경을 구축합니다. mn 명령의 매개 변수는 다음과 같이 입니다.
| 매개변수 | 값 | 설명 |
|---|---|---|
| topo | linear,3,2 | 3 개의 스위치가 직렬로 연결되는 토폴로지 (각 스위치에 2 개의 호스트가 연결되는) |
| mac | 없음 | 자동으로 호스트의 MAC 주소를 설정 |
| switch | ovsk | Open vSwitch를 사용 |
| controller | remote | OpenFlow 컨트롤러는 외부의 것을 이용 |
| x | 없음 | xterm을 시작 |
실행 예는 다음과 같습니다.
ryu@ryu-vm:~$ sudo mn --topo linear,3,2 --mac --switch ovsk --controller remote -x
*** Creating network
*** Adding controller
Unable to contact the remote controller at 127.0.0.1:6633
*** Adding hosts:
h1s1 h1s2 h1s3 h2s1 h2s2 h2s3
*** Adding switches:
s1 s2 s3
*** Adding links:
(h1s1, s1) (h1s2, s2) (h1s3, s3) (h2s1, s1) (h2s2, s2) (h2s3, s3) (s1, s2) (s2, s3)
*** Configuring hosts
h1s1 h1s2 h1s3 h2s1 h2s2 h2s3
*** Running terms on localhost:10.0
*** Starting controller
*** Starting 3 switches
s1 s2 s3
*** Starting CLI:
mininet>
또한 컨트롤러의 xterm을 하나 더 시작합니다.
mininet> xterm c0
mininet>
이어 각 라우터에서 사용하는 OpenFlow 버전을 1.3으로 설정합니다.
switch: s1 (root):
root@ryu-vm:~# ovs-vsctl set Bridge s1 protocols=OpenFlow13
switch: s2 (root):
root@ryu-vm:~# ovs-vsctl set Bridge s2 protocols=OpenFlow13
switch: s3 (root):
root@ryu-vm:~# ovs-vsctl set Bridge s3 protocols=OpenFlow13
그런 다음 각 호스트 인터페이스에 VLAN ID를 설정하고 새로운 IP 주소를 설정 합니다.
host: h1s1:
root@ryu-vm:~# ip addr del 10.0.0.1/8 dev h1s1-eth0
root@ryu-vm:~# ip link add link h1s1-eth0 name h1s1-eth0.2 type vlan id 2
root@ryu-vm:~# ip addr add 172.16.10.10/24 dev h1s1-eth0.2
root@ryu-vm:~# ip link set dev h1s1-eth0.2 up
host: h2s1:
root@ryu-vm:~# ip addr del 10.0.0.4/8 dev h2s1-eth0
root@ryu-vm:~# ip link add link h2s1-eth0 name h2s1-eth0.110 type vlan id 110
root@ryu-vm:~# ip addr add 172.16.10.11/24 dev h2s1-eth0.110
root@ryu-vm:~# ip link set dev h2s1-eth0.110 up
host: h1s2:
root@ryu-vm:~# ip addr del 10.0.0.2/8 dev h1s2-eth0
root@ryu-vm:~# ip link add link h1s2-eth0 name h1s2-eth0.2 type vlan id 2
root@ryu-vm:~# ip addr add 192.168.30.10/24 dev h1s2-eth0.2
root@ryu-vm:~# ip link set dev h1s2-eth0.2 up
host: h2s2:
root@ryu-vm:~# ip addr del 10.0.0.5/8 dev h2s2-eth0
root@ryu-vm:~# ip link add link h2s2-eth0 name h2s2-eth0.110 type vlan id 110
root@ryu-vm:~# ip addr add 192.168.30.11/24 dev h2s2-eth0.110
root@ryu-vm:~# ip link set dev h2s2-eth0.110 up
host: h1s3:
root@ryu-vm:~# ip addr del 10.0.0.3/8 dev h1s3-eth0
root@ryu-vm:~# ip link add link h1s3-eth0 name h1s3-eth0.2 type vlan id 2
root@ryu-vm:~# ip addr add 172.16.20.10/24 dev h1s3-eth0.2
root@ryu-vm:~# ip link set dev h1s3-eth0.2 up
host: h2s3:
root@ryu-vm:~# ip addr del 10.0.0.6/8 dev h2s3-eth0
root@ryu-vm:~# ip link add link h2s3-eth0 name h2s3-eth0.110 type vlan id 110
root@ryu-vm:~# ip addr add 172.16.20.11/24 dev h2s3-eth0.110
root@ryu-vm:~# ip link set dev h2s3-eth0.110 up
마지막으로, 컨트롤러 xterm에서 rest_router을 시작합니다.
controller: c0 (root):
root@ryu-vm:~# ryu-manager ryu.app.rest_router
loading app ryu.app.rest_router
loading app ryu.controller.ofp_handler
instantiating app None of DPSet
creating context dpset
creating context wsgi
instantiating app ryu.app.rest_router of RestRouterAPI
instantiating app ryu.controller.ofp_handler of OFPHandler
(2447) wsgi starting up on http://0.0.0.0:8080/
Ryu와 라우터 간의 연결에 성공하면 다음 메시지가 표시됩니다.
controller: c0 (root):
[RT][INFO] switch_id=0000000000000003: Set SW config for TTL error packet in.
[RT][INFO] switch_id=0000000000000003: Set ARP handling (packet in) flow [cookie=0x0]
[RT][INFO] switch_id=0000000000000003: Set L2 switching (normal) flow [cookie=0x0]
[RT][INFO] switch_id=0000000000000003: Set default route (drop) flow [cookie=0x0]
[RT][INFO] switch_id=0000000000000003: Start cyclic routing table update.
[RT][INFO] switch_id=0000000000000003: Join as router.
...
위 로그 라우터 3 대분이 표시되면 준비 완료입니다.
주소 설정
각 라우터에 주소를 설정합니다.
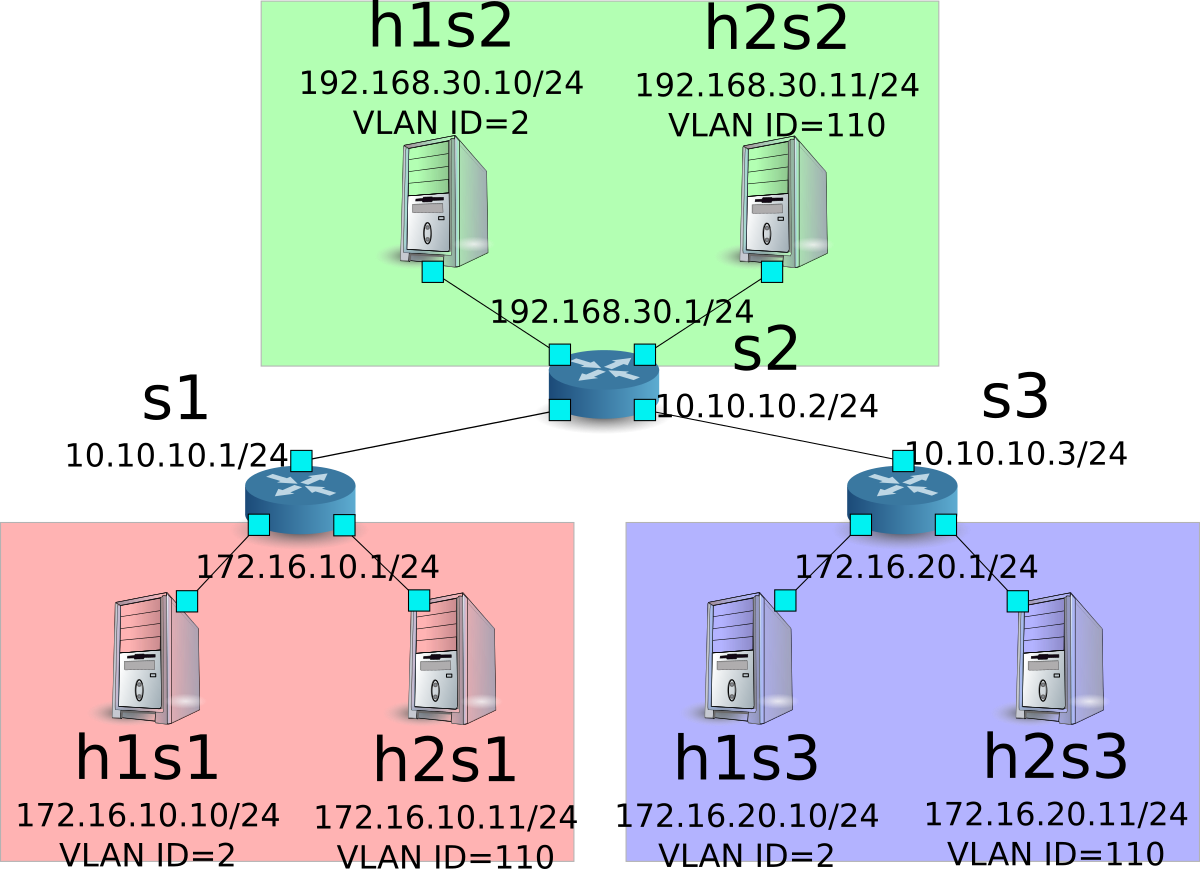
먼저 라우터 s1 주소 「172.16.20.1/24」와 「10.10.10.1/24」을 설정합니다. 입니다. 각 VLAN ID마다 설정해야합니다.
Node: c0 (root):
root@ryu-vm:~# curl -X POST -d '{"address": "172.16.10.1/24"}' http://localhost:8080/router/0000000000000001/2
  [
    {
      "switch_id": "0000000000000001",
      "command_result": [
        {
          "result": "success",
          "vlan_id": 2,
          "details": "Add address [address_id=1]"
        }
      ]
    }
  ]

root@ryu-vm:~# curl -X POST -d '{"address": "10.10.10.1/24"}' http://localhost:8080/router/0000000000000001/2
  [
    {
      "switch_id": "0000000000000001",
      "command_result": [
        {
          "result": "success",
          "vlan_id": 2,
          "details": "Add address [address_id=2]"
        }
      ]
    }
  ]

root@ryu-vm:~# curl -X POST -d '{"address": "172.16.10.1/24"}' http://localhost:8080/router/0000000000000001/110
  [
    {
      "switch_id": "0000000000000001",
      "command_result": [
        {
          "result": "success",
          "vlan_id": 110,
          "details": "Add address [address_id=1]"
        }
      ]
    }
  ]

root@ryu-vm:~# curl -X POST -d '{"address": "10.10.10.1/24"}' http://localhost:8080/router/0000000000000001/110
  [
    {
      "switch_id": "0000000000000001",
      "command_result": [
        {
          "result": "success",
          "vlan_id": 110,
          "details": "Add address [address_id=2]"
        }
      ]
    }
  ]
그런 다음 라우터 s2에 주소 「192.168.30.1/24」와 「10.10.10.2/24」을 설정 합니다.
Node: c0 (root):
root@ryu-vm:~# curl -X POST -d '{"address": "192.168.30.1/24"}' http://localhost:8080/router/0000000000000002/2
  [
    {
      "switch_id": "0000000000000002",
      "command_result": [
        {
          "result": "success",
          "vlan_id": 2,
          "details": "Add address [address_id=1]"
        }
      ]
    }
  ]

root@ryu-vm:~# curl -X POST -d '{"address": "10.10.10.2/24"}' http://localhost:8080/router/0000000000000002/2
  [
    {
      "switch_id": "0000000000000002",
      "command_result": [
        {
          "result": "success",
          "vlan_id": 2,
          "details": "Add address [address_id=2]"
        }
      ]
    }
  ]

root@ryu-vm:~# curl -X POST -d '{"address": "192.168.30.1/24"}' http://localhost:8080/router/0000000000000002/110
  [
    {
      "switch_id": "0000000000000002",
      "command_result": [
        {
          "result": "success",
          "vlan_id": 110,
          "details": "Add address [address_id=1]"
        }
      ]
    }
  ]

root@ryu-vm:~# curl -X POST -d '{"address": "10.10.10.2/24"}' http://localhost:8080/router/0000000000000002/110
  [
    {
      "switch_id": "0000000000000002",
      "command_result": [
        {
          "result": "success",
          "vlan_id": 110,
          "details": "Add address [address_id=2]"
        }
      ]
    }
  ]
또한 라우터 s3에 주소 「172.16.20.1/24」와 「10.10.10.3/24」을 설정합니 다.
Node: c0 (root):
root@ryu-vm:~# curl -X POST -d '{"address": "172.16.20.1/24"}' http://localhost:8080/router/0000000000000003/2
  [
    {
      "switch_id": "0000000000000003",
      "command_result": [
        {
          "result": "success",
          "vlan_id": 2,
          "details": "Add address [address_id=1]"
        }
      ]
    }
  ]

root@ryu-vm:~# curl -X POST -d '{"address": "10.10.10.3/24"}' http://localhost:8080/router/0000000000000003/2
  [
    {
      "switch_id": "0000000000000003",
      "command_result": [
        {
          "result": "success",
          "vlan_id": 2,
          "details": "Add address [address_id=2]"
        }
      ]
    }
  ]

root@ryu-vm:~# curl -X POST -d '{"address": "172.16.20.1/24"}' http://localhost:8080/router/0000000000000003/110
  [
    {
      "switch_id": "0000000000000003",
      "command_result": [
        {
          "result": "success",
          "vlan_id": 110,
          "details": "Add address [address_id=1]"
        }
      ]
    }
  ]

root@ryu-vm:~# curl -X POST -d '{"address": "10.10.10.3/24"}' http://localhost:8080/router/0000000000000003/110
  [
    {
      "switch_id": "0000000000000003",
      "command_result": [
        {
          "result": "success",
          "vlan_id": 110,
          "details": "Add address [address_id=2]"
        }
      ]
    }
  ]
라우터에 IP 주소를 할당할 수 있기 때문에 각 호스트에 기본 게이트웨이로 등록합니다.
host: h1s1:
root@ryu-vm:~# ip route add default via 172.16.10.1
host: h2s1:
root@ryu-vm:~# ip route add default via 172.16.10.1
host: h1s2:
root@ryu-vm:~# ip route add default via 192.168.30.1
host: h2s2:
root@ryu-vm:~# ip route add default via 192.168.30.1
host: h1s3:
root@ryu-vm:~# ip route add default via 172.16.20.1
host: h2s3:
root@ryu-vm:~# ip route add default via 172.16.20.1
설정된 주소는 다음과 같습니다.
기본 경로 및 정적 경로 설정
각 라우터에 기본 경로 및 정적 경로를 설정합니다.
먼저 라우터 s1의 기본 경로로 라우터 s2를 설정합니다.
Node: c0 (root):
root@ryu-vm:~# curl -X POST -d '{"gateway": "10.10.10.2"}' http://localhost:8080/router/0000000000000001/2
  [
    {
      "switch_id": "0000000000000001",
      "command_result": [
        {
          "result": "success",
          "vlan_id": 2,
          "details": "Add route [route_id=1]"
        }
      ]
    }
  ]

root@ryu-vm:~# curl -X POST -d '{"gateway": "10.10.10.2"}' http://localhost:8080/router/0000000000000001/110
  [
    {
      "switch_id": "0000000000000001",
      "command_result": [
        {
          "result": "success",
          "vlan_id": 110,
          "details": "Add route [route_id=1]"
        }
      ]
    }
  ]
라우터 s2의 기본 경로는 라우터 s1을 설정합니다.
Node: c0 (root):
root@ryu-vm:~# curl -X POST -d '{"gateway": "10.10.10.1"}' http://localhost:8080/router/0000000000000002/2
  [
    {
      "switch_id": "0000000000000002",
      "command_result": [
        {
          "result": "success",
          "vlan_id": 2,
          "details": "Add route [route_id=1]"
        }
      ]
    }
  ]

root@ryu-vm:~# curl -X POST -d '{"gateway": "10.10.10.1"}' http://localhost:8080/router/0000000000000002/110
  [
    {
      "switch_id": "0000000000000002",
      "command_result": [
        {
          "result": "success",
          "vlan_id": 110,
          "details": "Add route [route_id=1]"
        }
      ]
    }
  ]
라우터 s3의 기본 경로는 라우터 s2를 설정합니다.
Node: c0 (root):
root@ryu-vm:~# curl -X POST -d '{"gateway": "10.10.10.2"}' http://localhost:8080/router/0000000000000003/2
  [
    {
      "switch_id": "0000000000000003",
      "command_result": [
        {
          "result": "success",
          "vlan_id": 2,
          "details": "Add route [route_id=1]"
        }
      ]
    }
  ]

root@ryu-vm:~# curl -X POST -d '{"gateway": "10.10.10.2"}' http://localhost:8080/router/0000000000000003/110
  [
    {
      "switch_id": "0000000000000003",
      "command_result": [
        {
          "result": "success",
          "vlan_id": 110,
          "details": "Add route [route_id=1]"
        }
      ]
    }
  ]
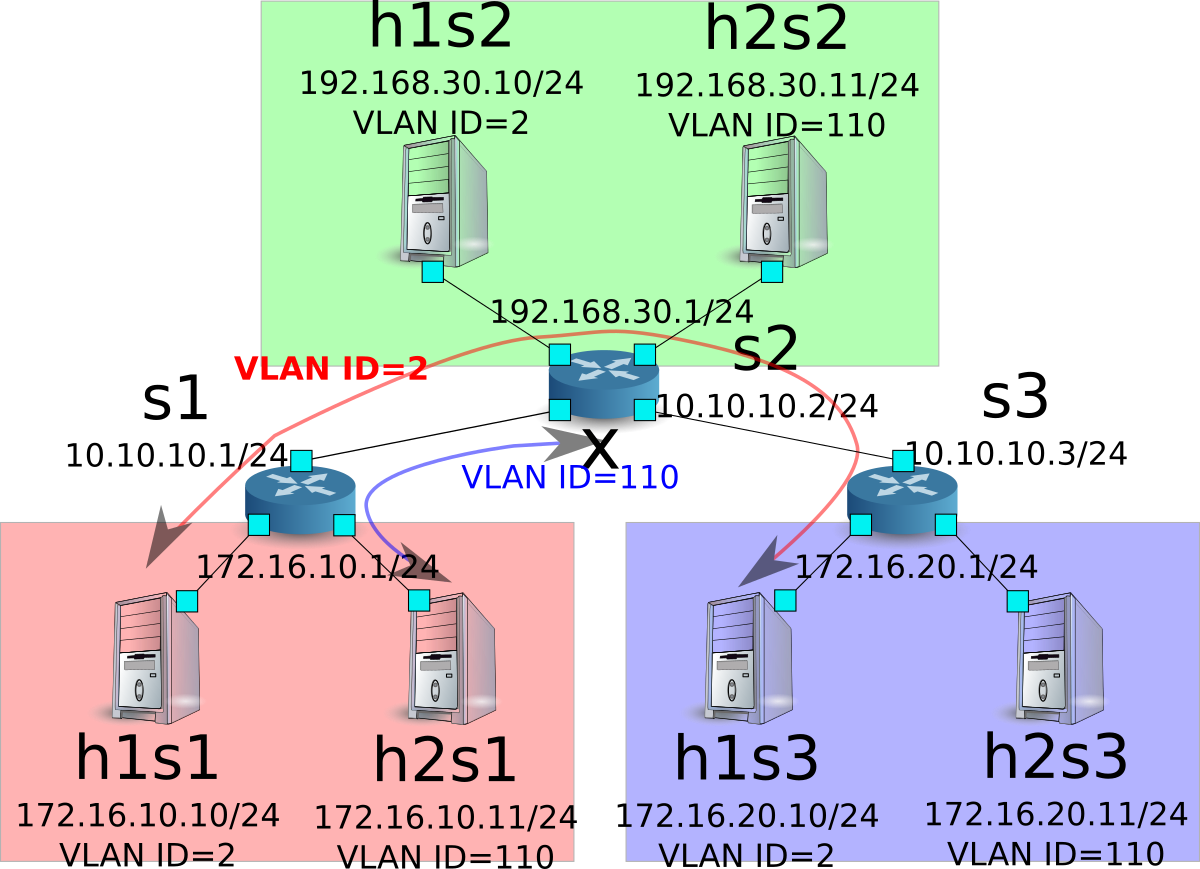
이어 라우터 s2에 대해 라우터 s3 부하의 호스트 (172.16.20.0/24)의 정적 경로를 설정합니다. vlan_id=2 인 경우에만 설정합니다.
Node: c0 (root):
root@ryu-vm:~# curl -X POST -d '{"destination": "172.16.20.0/24", "gateway": "10.10.10.3"}' http://localhost:8080/router/0000000000000002/2
  [
    {
      "switch_id": "0000000000000002",
      "command_result": [
        {
          "result": "success",
          "vlan_id": 2,
          "details": "Add route [route_id=2]"
        }
      ]
    }
  ]
설정 내용 확인
각 라우터에 설정된 내용을 확인합니다.
Node: c0 (root):
root@ryu-vm:~# curl http://localhost:8080/router/all/all
  [
    {
      "internal_network": [
        {},
        {
          "route": [
            {
              "route_id": 1,
              "destination": "0.0.0.0/0",
              "gateway": "10.10.10.2"
            }
          ],
          "vlan_id": 2,
          "address": [
            {
              "address_id": 2,
              "address": "10.10.10.1/24"
            },
            {
              "address_id": 1,
              "address": "172.16.10.1/24"
            }
          ]
        },
        {
          "route": [
            {
              "route_id": 1,
              "destination": "0.0.0.0/0",
              "gateway": "10.10.10.2"
            }
          ],
          "vlan_id": 110,
          "address": [
            {
              "address_id": 2,
              "address": "10.10.10.1/24"
            },
            {
              "address_id": 1,
              "address": "172.16.10.1/24"
            }
          ]
        }
      ],
      "switch_id": "0000000000000001"
    },
    {
      "internal_network": [
        {},
        {
          "route": [
            {
              "route_id": 2,
              "destination": "172.16.20.0/24",
              "gateway": "10.10.10.3"
            },
            {
              "route_id": 1,
              "destination": "0.0.0.0/0",
              "gateway": "10.10.10.1"
            }
          ],
          "vlan_id": 2,
          "address": [
            {
              "address_id": 2,
              "address": "10.10.10.2/24"
            },
            {
              "address_id": 1,
              "address": "192.168.30.1/24"
            }
          ]
        },
        {
          "route": [
            {
              "route_id": 1,
              "destination": "0.0.0.0/0",
              "gateway": "10.10.10.1"
            }
          ],
          "vlan_id": 110,
          "address": [
            {
              "address_id": 2,
              "address": "10.10.10.2/24"
            },
            {
              "address_id": 1,
              "address": "192.168.30.1/24"
            }
          ]
        }
      ],
      "switch_id": "0000000000000002"
    },
    {
      "internal_network": [
        {},
        {
          "route": [
            {
              "route_id": 1,
              "destination": "0.0.0.0/0",
              "gateway": "10.10.10.2"
            }
          ],
          "vlan_id": 2,
          "address": [
            {
              "address_id": 1,
              "address": "172.16.20.1/24"
            },
            {
              "address_id": 2,
              "address": "10.10.10.3/24"
            }
          ]
        },
        {
          "route": [
            {
              "route_id": 1,
              "destination": "0.0.0.0/0",
              "gateway": "10.10.10.2"
            }
          ],
          "vlan_id": 110,
          "address": [
            {
              "address_id": 1,
              "address": "172.16.20.1/24"
            },
            {
              "address_id": 2,
              "address": "10.10.10.3/24"
            }
          ]
        }
      ],
      "switch_id": "0000000000000003"
    }
  ]
각 라우터의 설정 내용을 표로 나타내면 다음과 같이 됩니다.
| 라우터 | VLAN ID | IP 주소 | 기본 경로 | 고정 경로 |
|---|---|---|---|---|
| s1 | 2 | 172.16.10.1/24, 10.10.10.1/24 | 10.10.10.2(s2) | |
| s1 | 110 | 172.16.10.1/24, 10.10.10.1/24 | 10.10.10.2(s2) | |
| s2 | 2 | 192.168.30.1/24, 10.10.10.2/24 | 10.10.10.1(s1) | 대상:172.16.20.0/24, 게이트웨이:10.10.10.3(s3) |
| s2 | 110 | 192.168.30.1/24, 10.10.10.2/24 | 10.10.10.1(s1) | |
| s3 | 2 | 172.16.20.1/24, 10.10.10.3/24 | 10.10.10.2(s2) | |
| s3 | 110 | 172.16.20.1/24, 10.10.10.3/24 | 10.10.10.2(s2) |
h1s1에서 h1s3에 대해 ping을 시도합니다. 같은 vlan_id=2의 호스트끼리이며, 라우터 s2에 s3에게 고정 경로가 설정되어 있기 때문에 통신이 가능합니다.
host: h1s1:
root@ryu-vm:~# ping 172.16.20.10
PING 172.16.20.10 (172.16.20.10) 56(84) bytes of data.
64 bytes from 172.16.20.10: icmp_req=1 ttl=61 time=45.9 ms
64 bytes from 172.16.20.10: icmp_req=2 ttl=61 time=0.257 ms
64 bytes from 172.16.20.10: icmp_req=3 ttl=61 time=0.059 ms
64 bytes from 172.16.20.10: icmp_req=4 ttl=61 time=0.182 ms
h2s1에서 h2s3 대해 ping을 시도합니다. 같은 vlan_id=110 호스트끼리이지만, 라우터 s2에 s3에게 고정 경로가 설정되어 있지 않기 때문에 통신이 불가능합니다.
host: h2s1:
root@ryu-vm:~# ping 172.16.20.11
PING 172.16.20.11 (172.16.20.11) 56(84) bytes of data.
^C
--- 172.16.20.11 ping statistics ---
8 packets transmitted, 0 received, 100% packet loss, time 7009ms
이 장에서는 구체적인 예를 들면서 라우터의 사용 방법을 설명했습니다.
REST API 목록
이 장에서 소개한 rest_router의 REST API를 나열합니다.
설정 가져오기
| 메서드 | GET |
| URL | /router/{switch}[/{vlan}] –switch: [ “all” | 스위치ID ] –vlan: [ “all” | VLAN ID ] |
| 주의 | VLAN ID의 지정은 선택 사항입니다. |
주소 설정
| 메서드 | POST |
| URL | /router/{switch}[/{vlan}] –switch: [ “all” | 스위치ID ] –vlan: [ “all” | VLAN ID ] |
| 데이터 | address:”<xxx.xxx.xxx.xxx/xx>” |
| 주의 | 주소 설정은 루트 설정 전에 수행해야합니다. VLAN ID의 지정은 선택 사항입니다. |
정적 경로 설정
| 메서드 | POST |
| URL | /router/{switch}[/{vlan}] –switch: [ “all” | 스위치ID ] –vlan: [ “all” | VLAN ID ] |
| 데이터 | destination:”<xxx.xxx.xxx.xxx/xx>” gateway:”<xxx.xxx.xxx.xxx>” |
| 주의 | VLAN ID의 지정은 선택 사항입니다. |
디폴트 경로 설정
| 메서드 | POST |
| URL | /router/{switch}[/{vlan}] –switch: [ “all” | 스위치ID ] –vlan: [ “all” | VLAN ID ] |
| 데이터 | gateway:”<xxx.xxx.xxx.xxx>” |
| 주의 | VLAN ID의 지정은 선택 사항입니다. |
주소 삭제
| 메서드 | DELETE |
| URL | /router/{switch}[/{vlan}] –switch: [ “all” | 스위치ID ] –vlan: [ “all” | VLAN ID ] |
| 데이터 | address_id:[ 1 - ... ] |
| 주의 | VLAN ID의 지정은 선택 사항입니다. |
루트 삭제
| 메서드 | DELETE |
| URL | /router/{switch}[/{vlan}] –switch: [ “all” | 스위치ID ] –vlan: [ “all” | VLAN ID ] |
| 데이터 | route_id:[ 1 - ... ] |
| 주의 | VLAN ID의 지정은 선택 사항입니다. |